You might think there isn’t much that can be done for a galley kitchen – removing an entire wall would take away valuable cabinet and countertop space, and the limited square footage makes it nearly impossible to change the layout at all. The good news is that you don’t have to completely change the layout or remove walls to create a beautifully updated aesthetic. Our most recent kitchen remodel in Fort Worth is a prime example!
Our client’s home was built in 1965. She inherited the home and knew that it needed to be remodeled, starting with the kitchen. Due to the existing floor plan, the option of completely opening the kitchen into the living room was unrealistic, since that side of the kitchen housed the sink, the dishwasher, and cabinet storage. She met with our team in hopes of updating the kitchen without having to compromise on storage or counter space.
After discussing these points with the client and describing the modern look she envisioned, our designers drew up detailed floor plans and 3D rendering of the proposed updates. These documents showed the structural and aesthetic changes to be made, ensuring our team had a clear understanding of what the client was expecting. Reviewing the designs together allowed for any necessary revisions and a final approval from the client. She absolutely loved the design and was anxious to get started with construction!
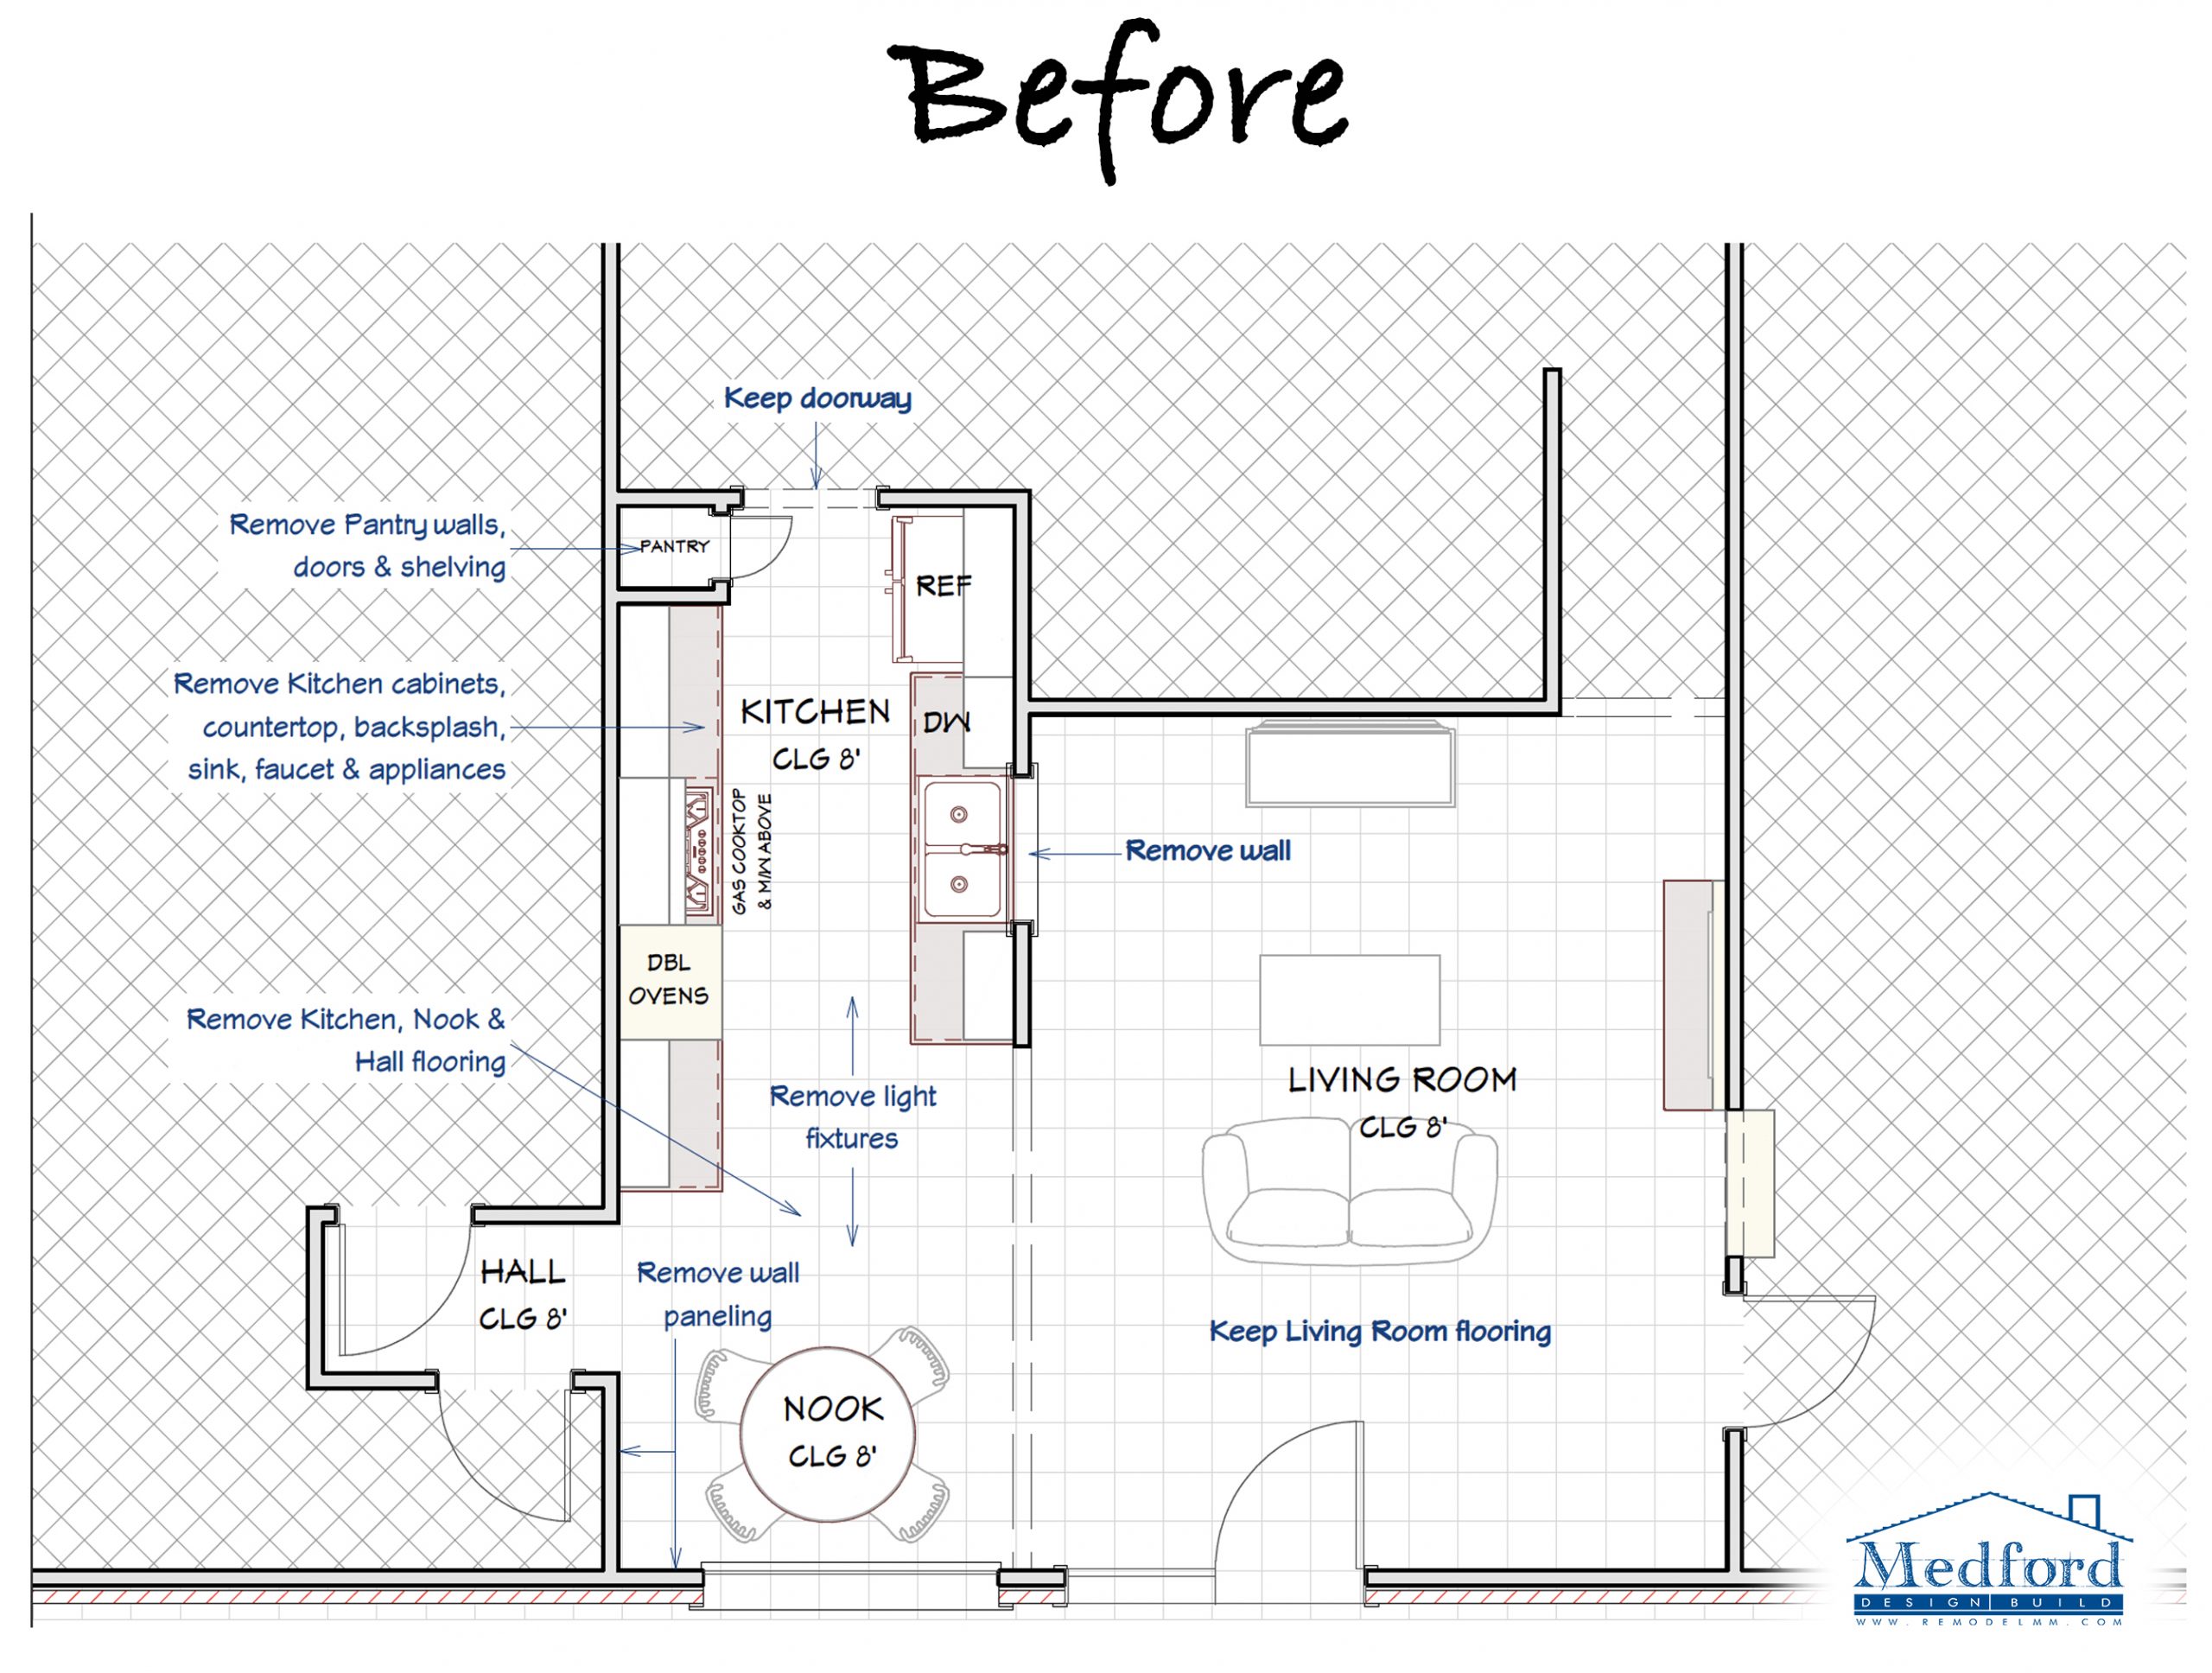
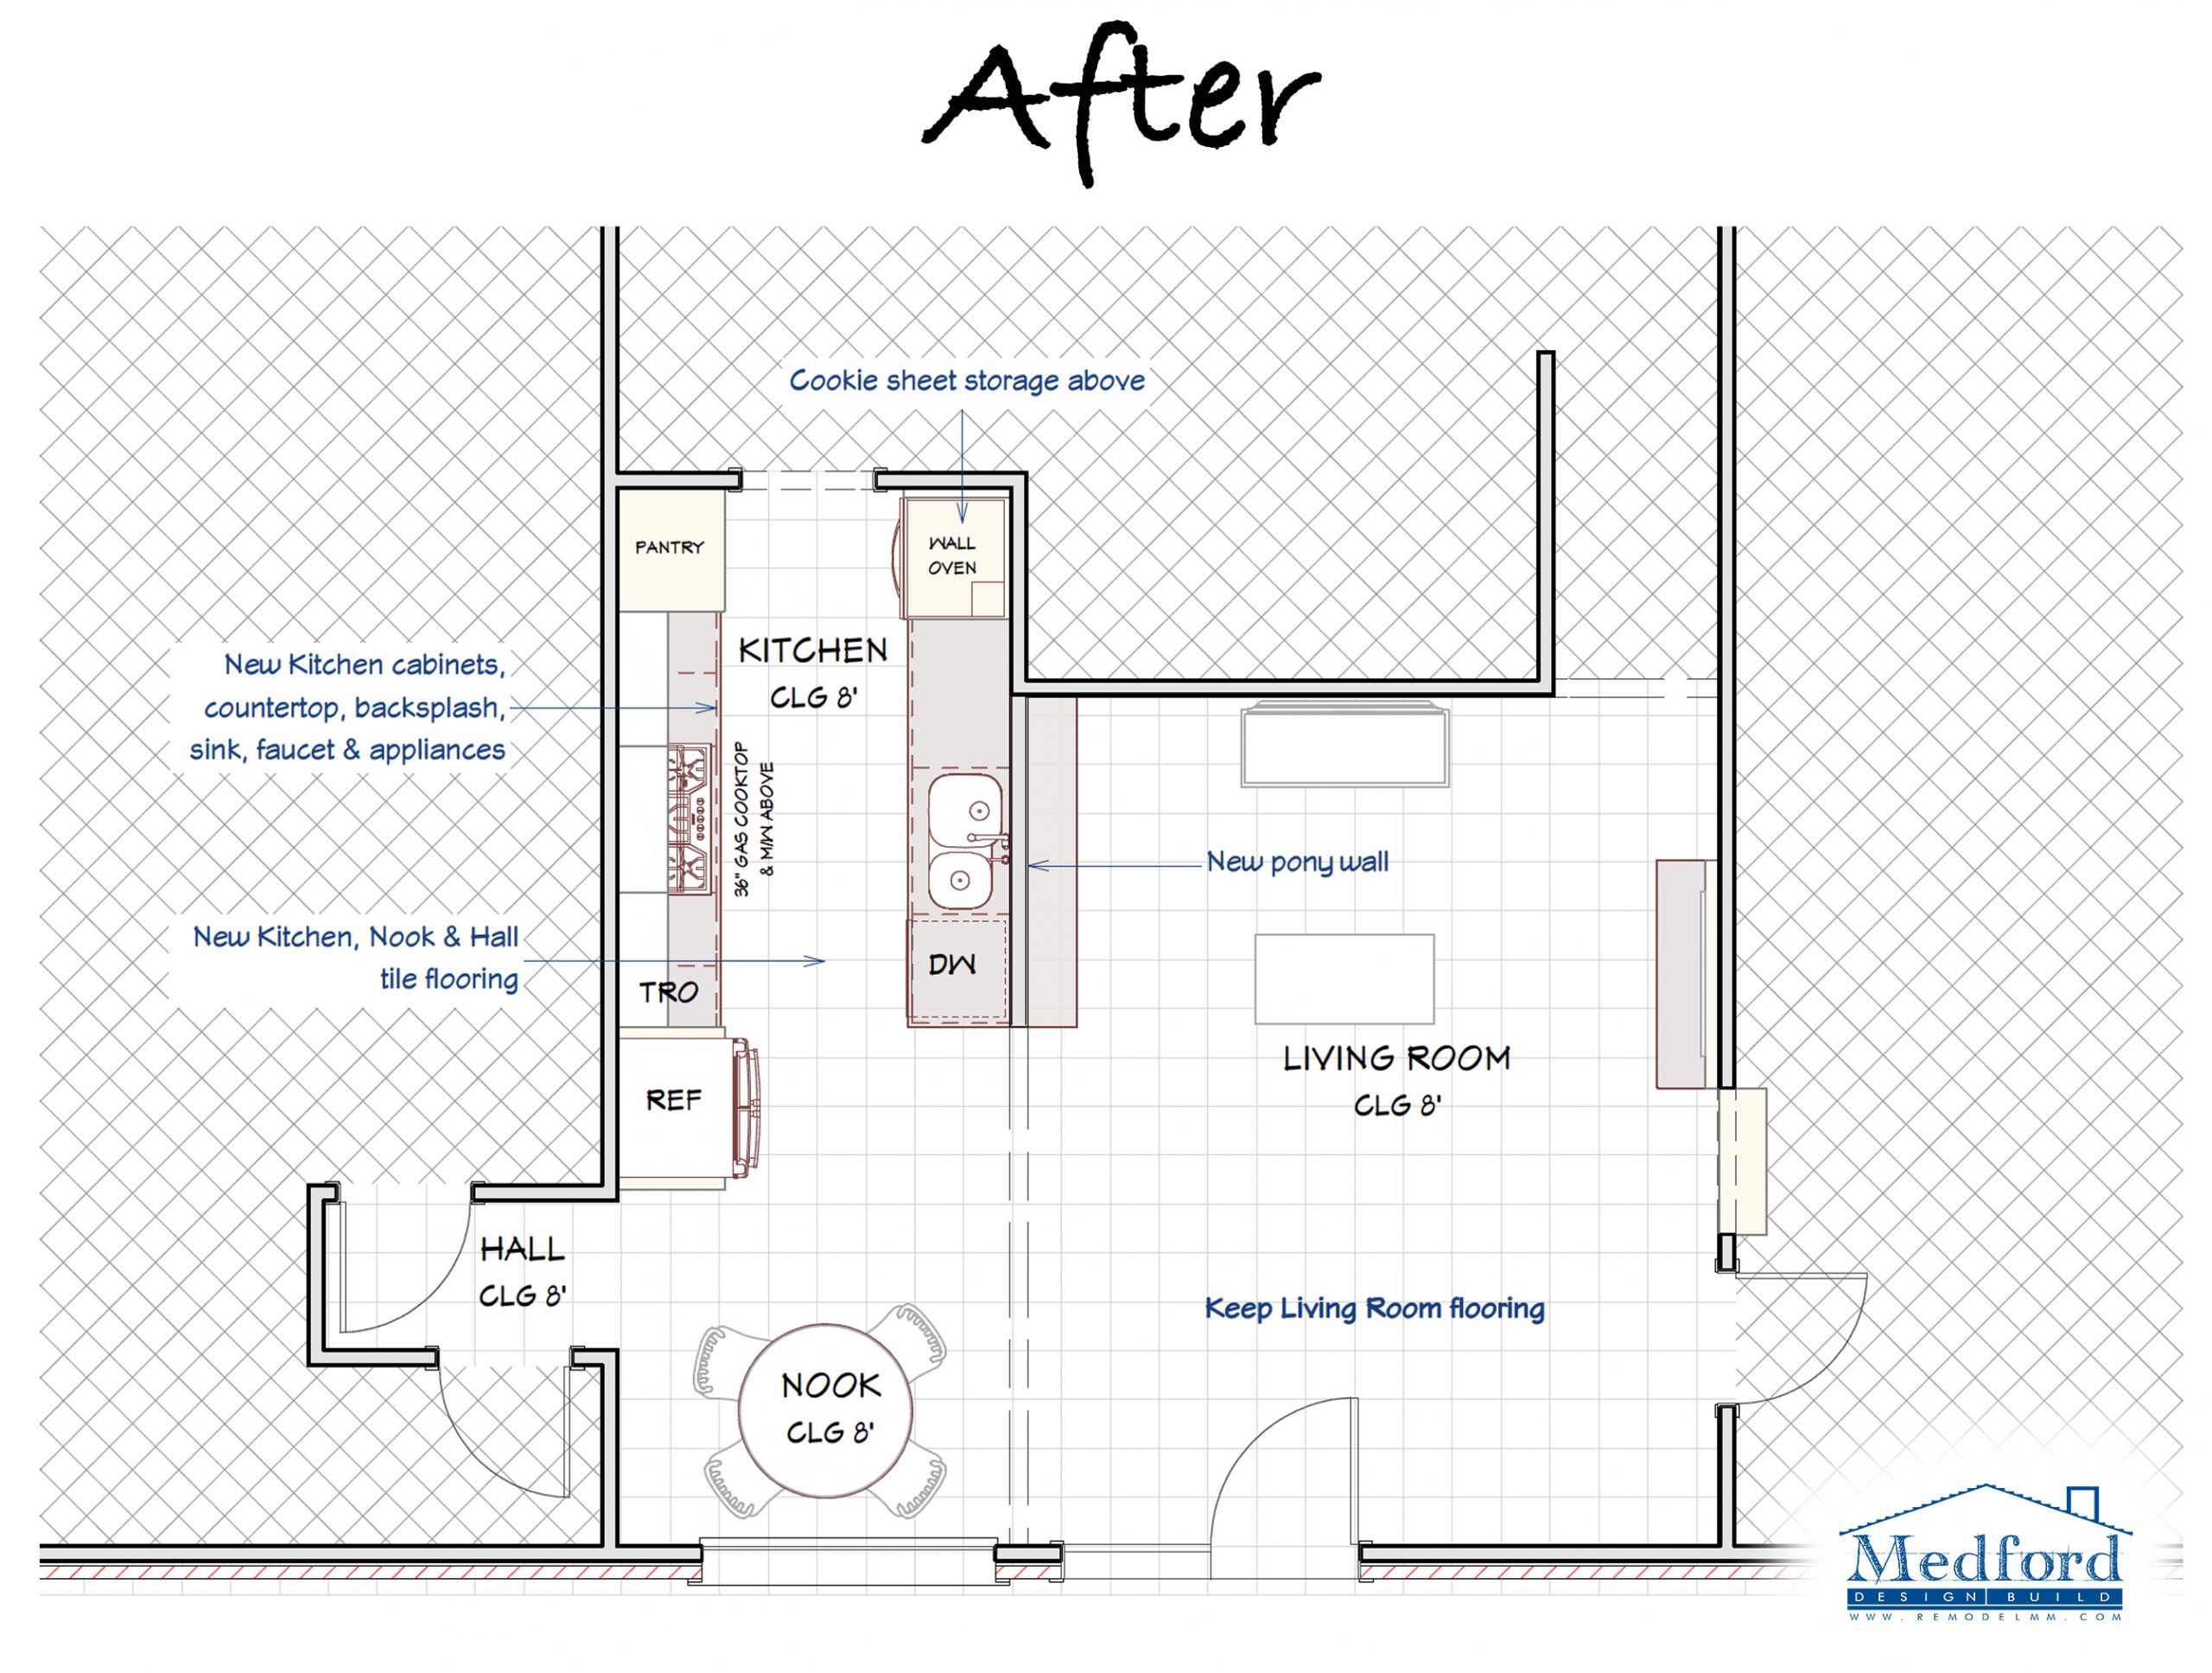
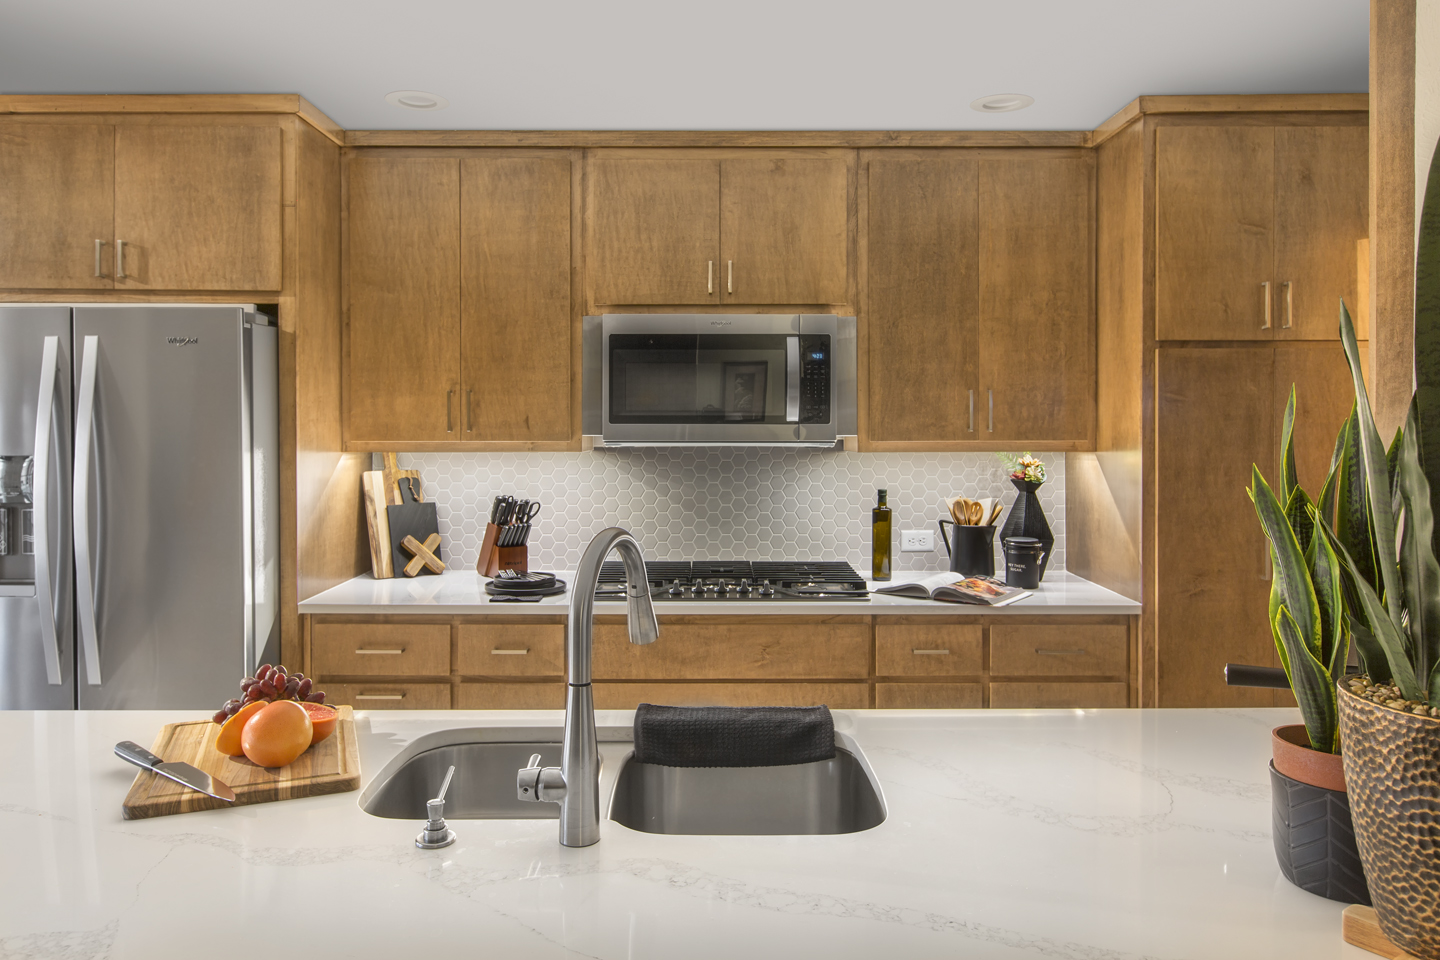
While the amount of space was a bit limiting, we were still able to move around some of the appliances to improve the functionality and flow of the kitchen. One of the most common changes we suggest when updating appliance location is anchoring the refrigerator on the outside of the kitchen instead of on an inner corner. This allows for easier access from the living room, limiting the number of people walking through the kitchen and potentially getting in the way of the cook – certainly a concern in a narrow galley kitchen like this one! We also relocated the dishwasher and replaced the old double oven with a single wall oven on the opposite end of the kitchen.
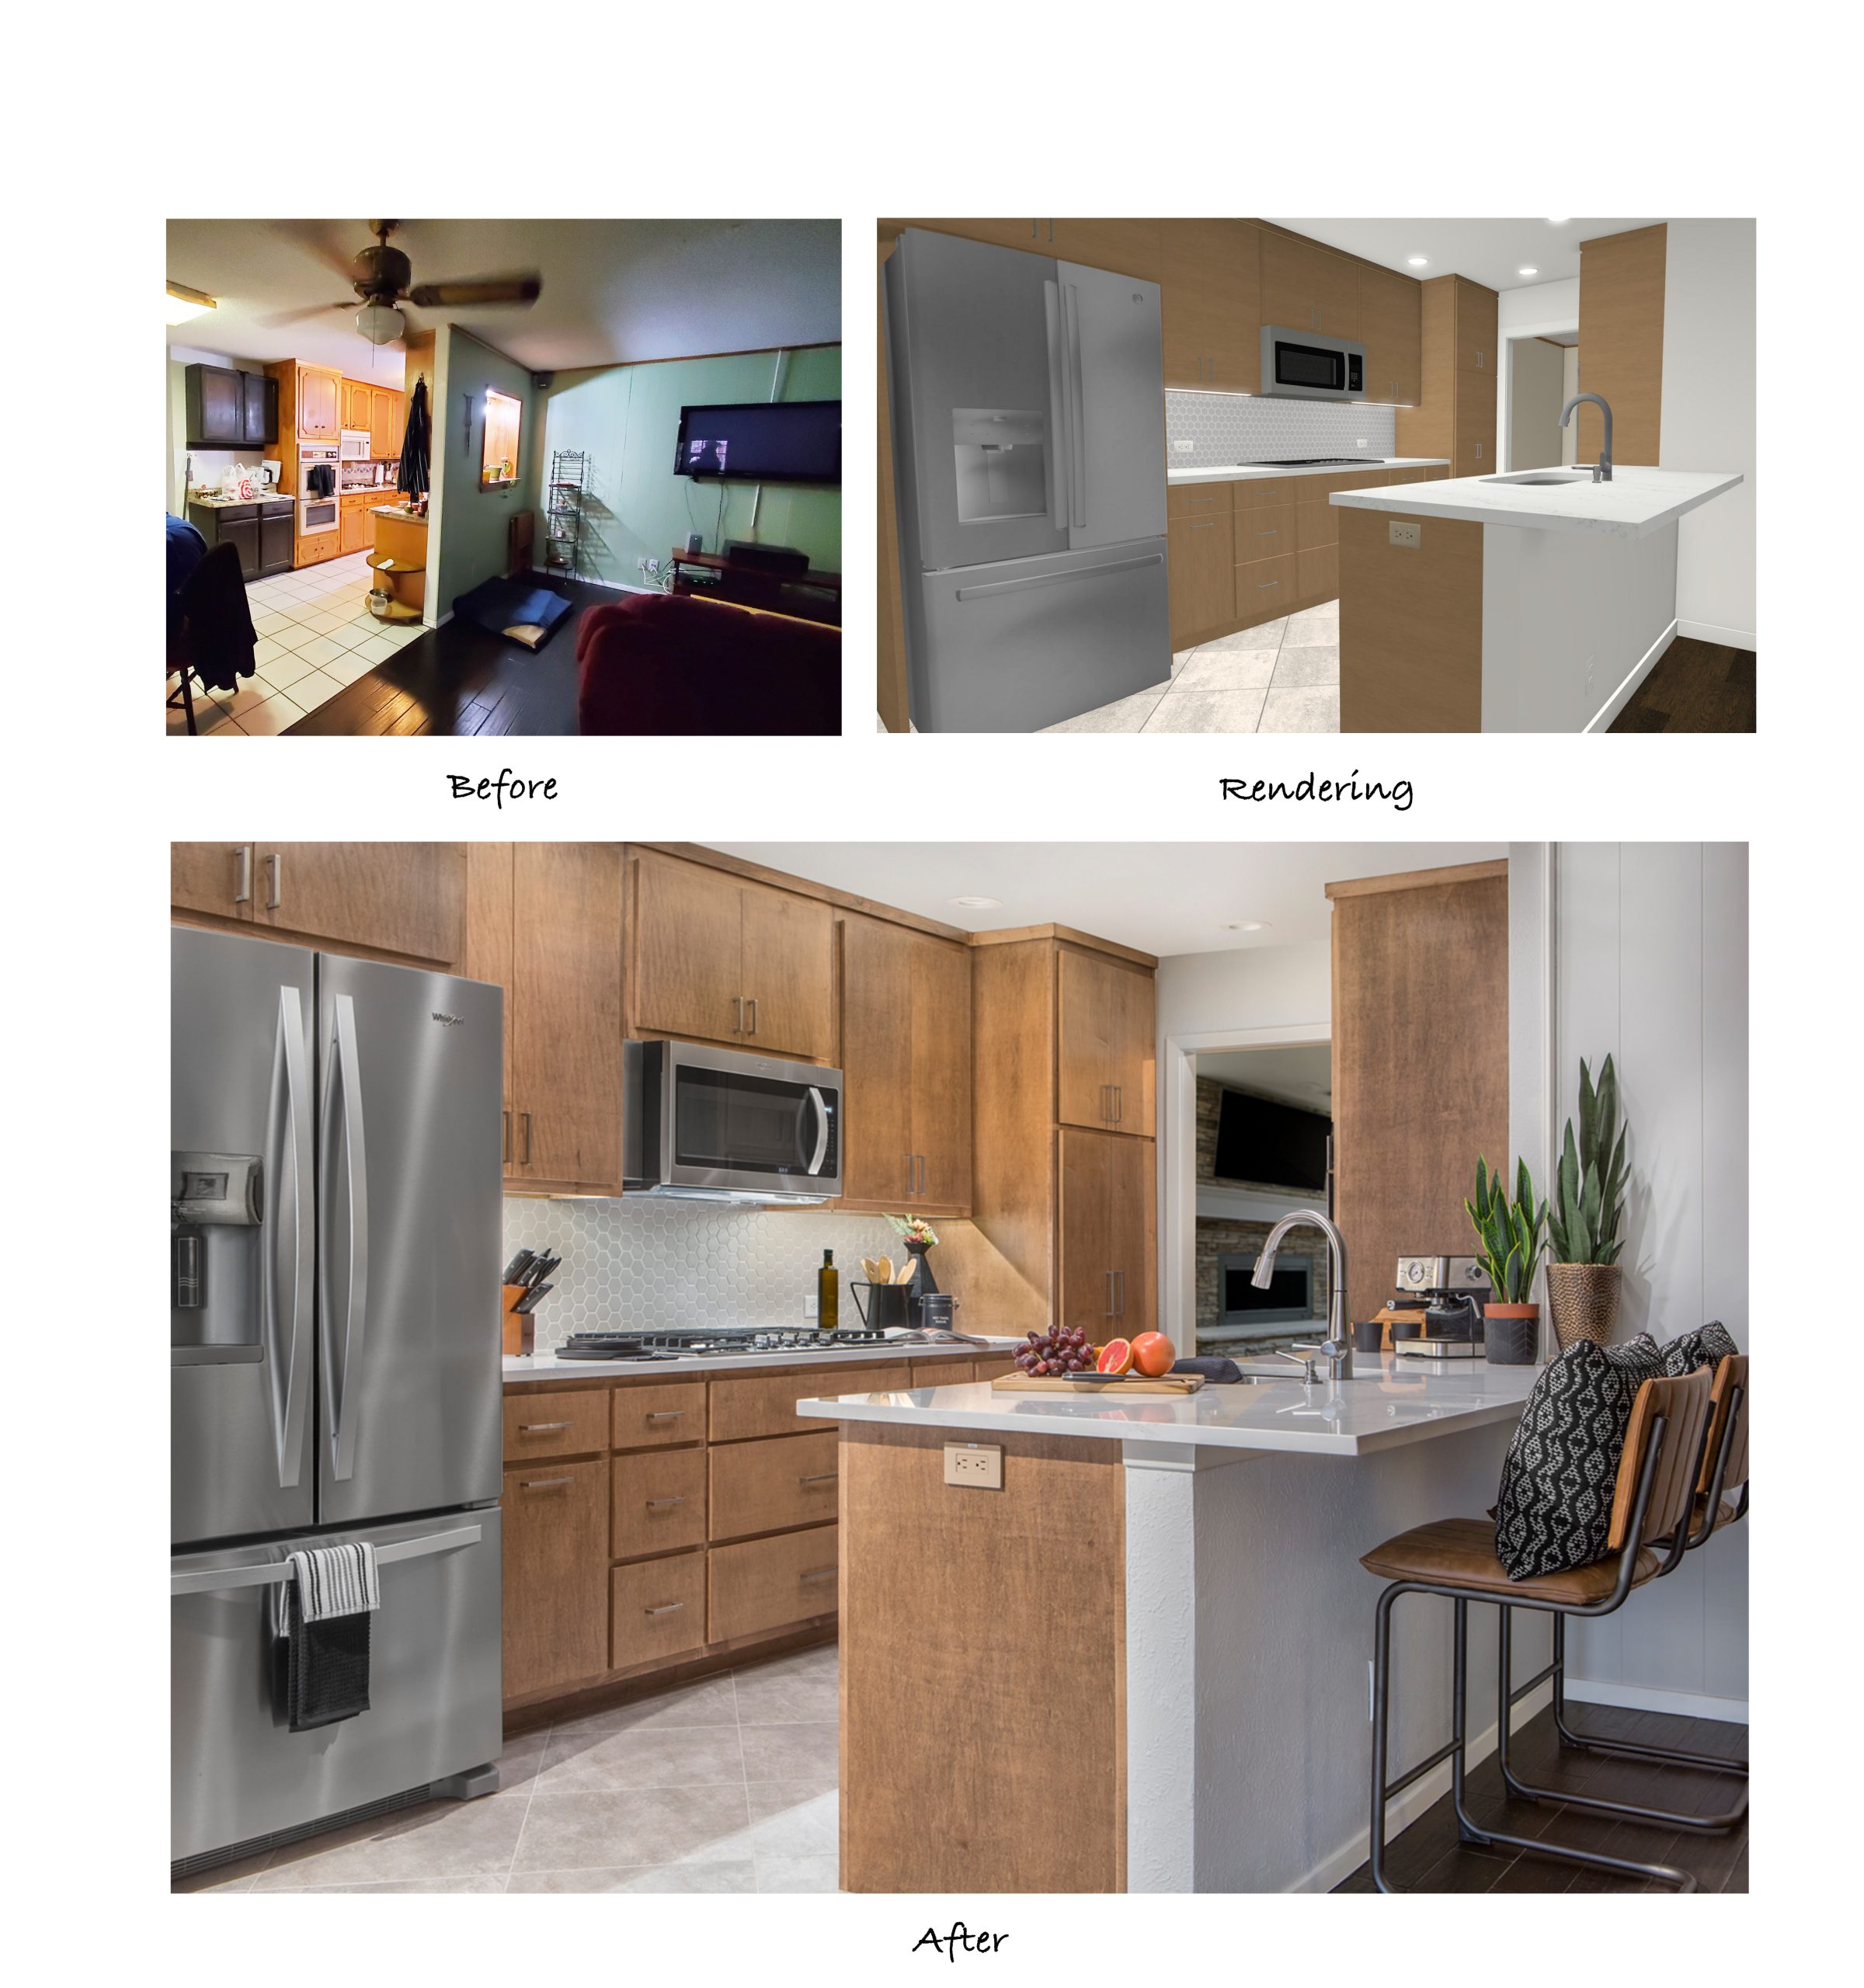
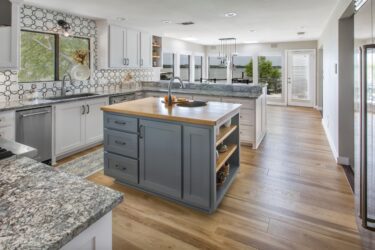
One of the most substantial changes involved removing the upper wall between the living room and kitchen to create a peninsula and a more spacious feel. This also provided for additional seating with the creation of a sitting bar and showcased the beautiful new cabinetry that can now be seen from the living room.
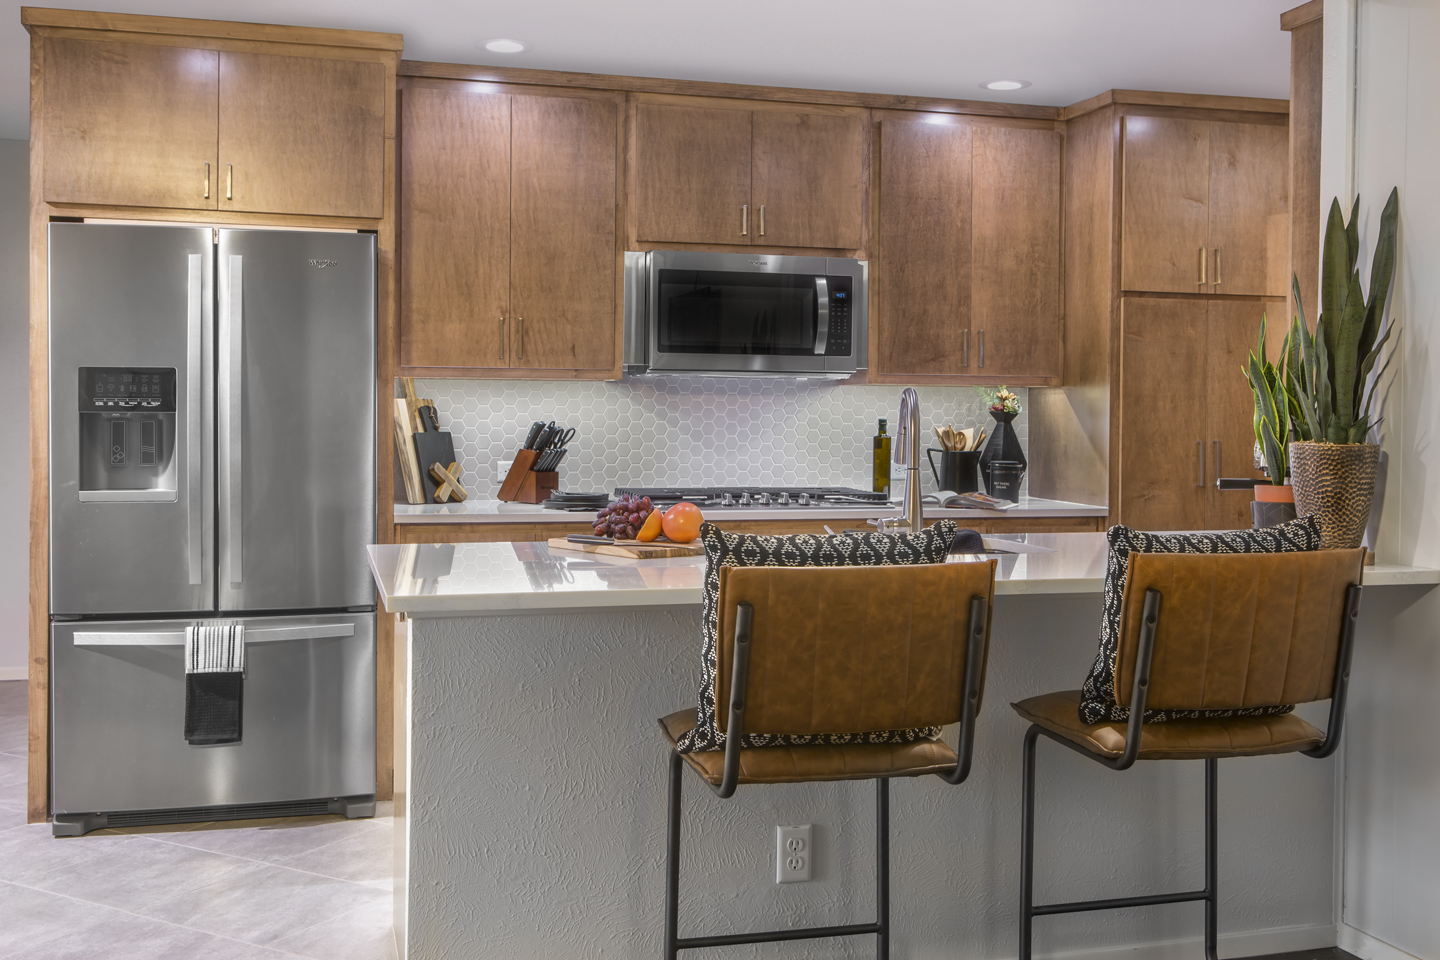
Strategically placed LED can lights combined with LED undercabinet lights create a near-shadowless environment, ideal for cooking and meal prep. It’s surprising how different a space can look with new lighting alone!
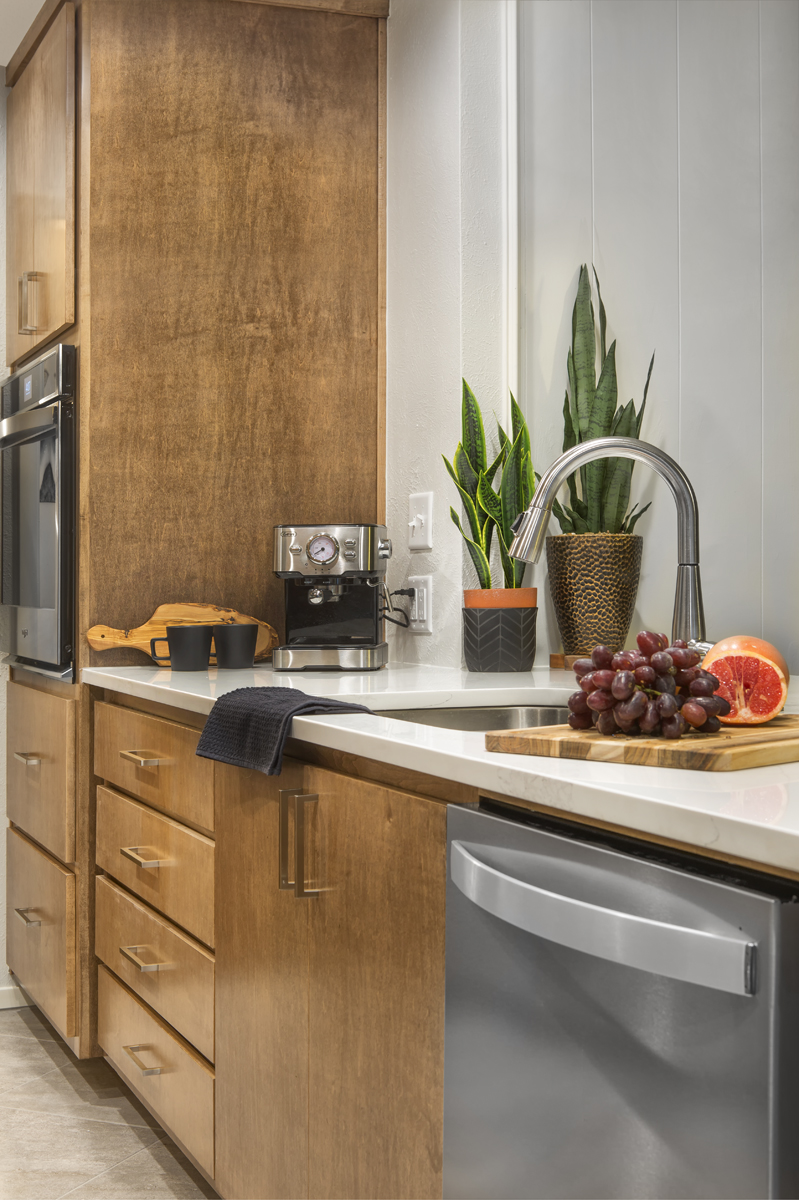
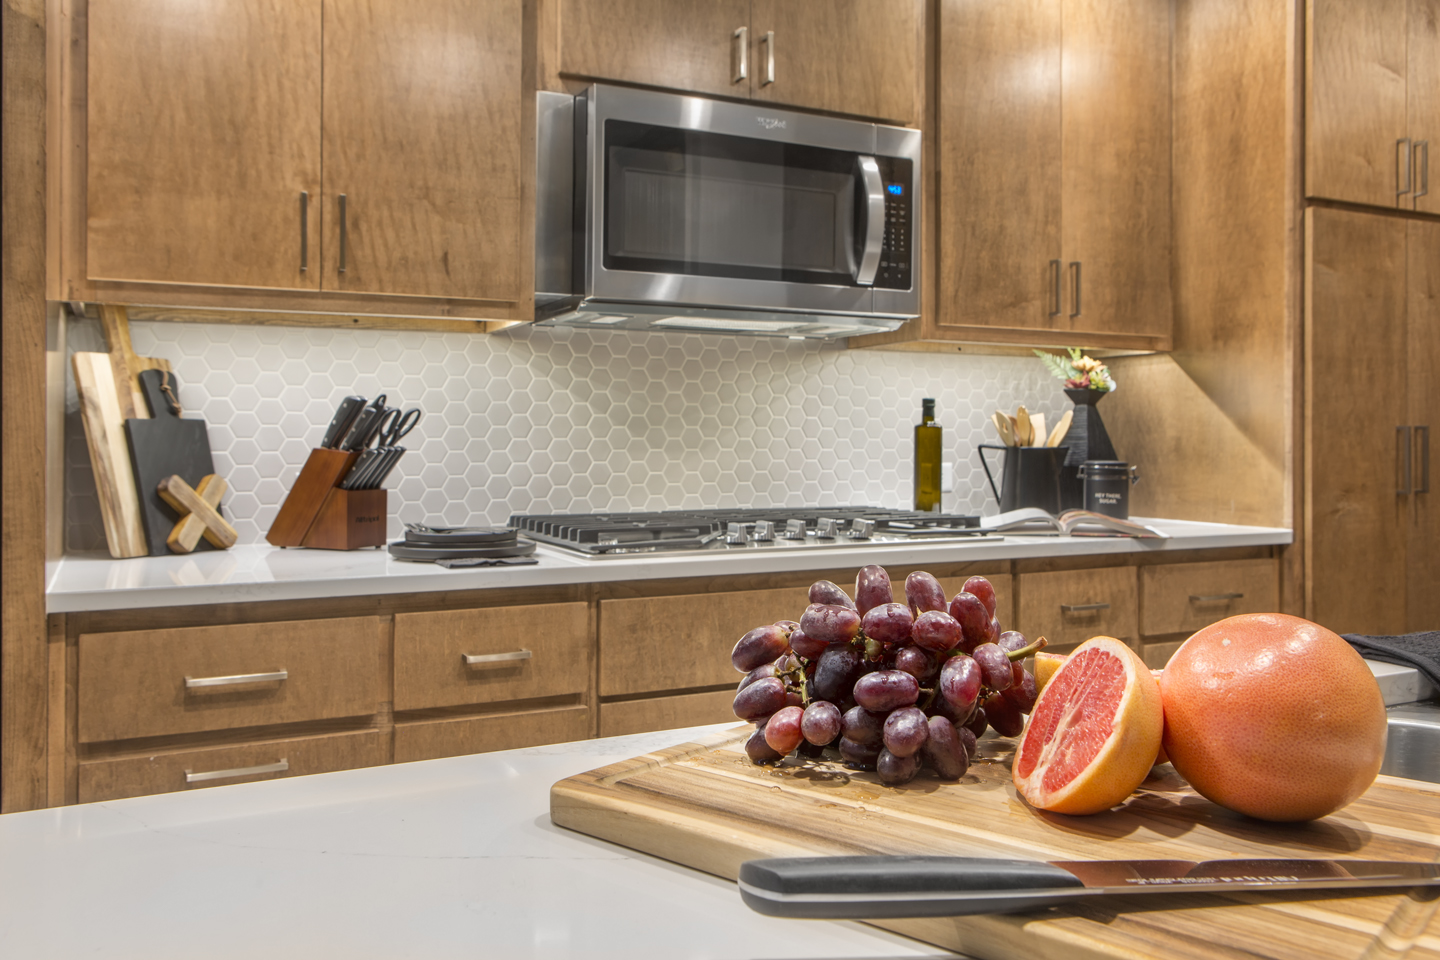
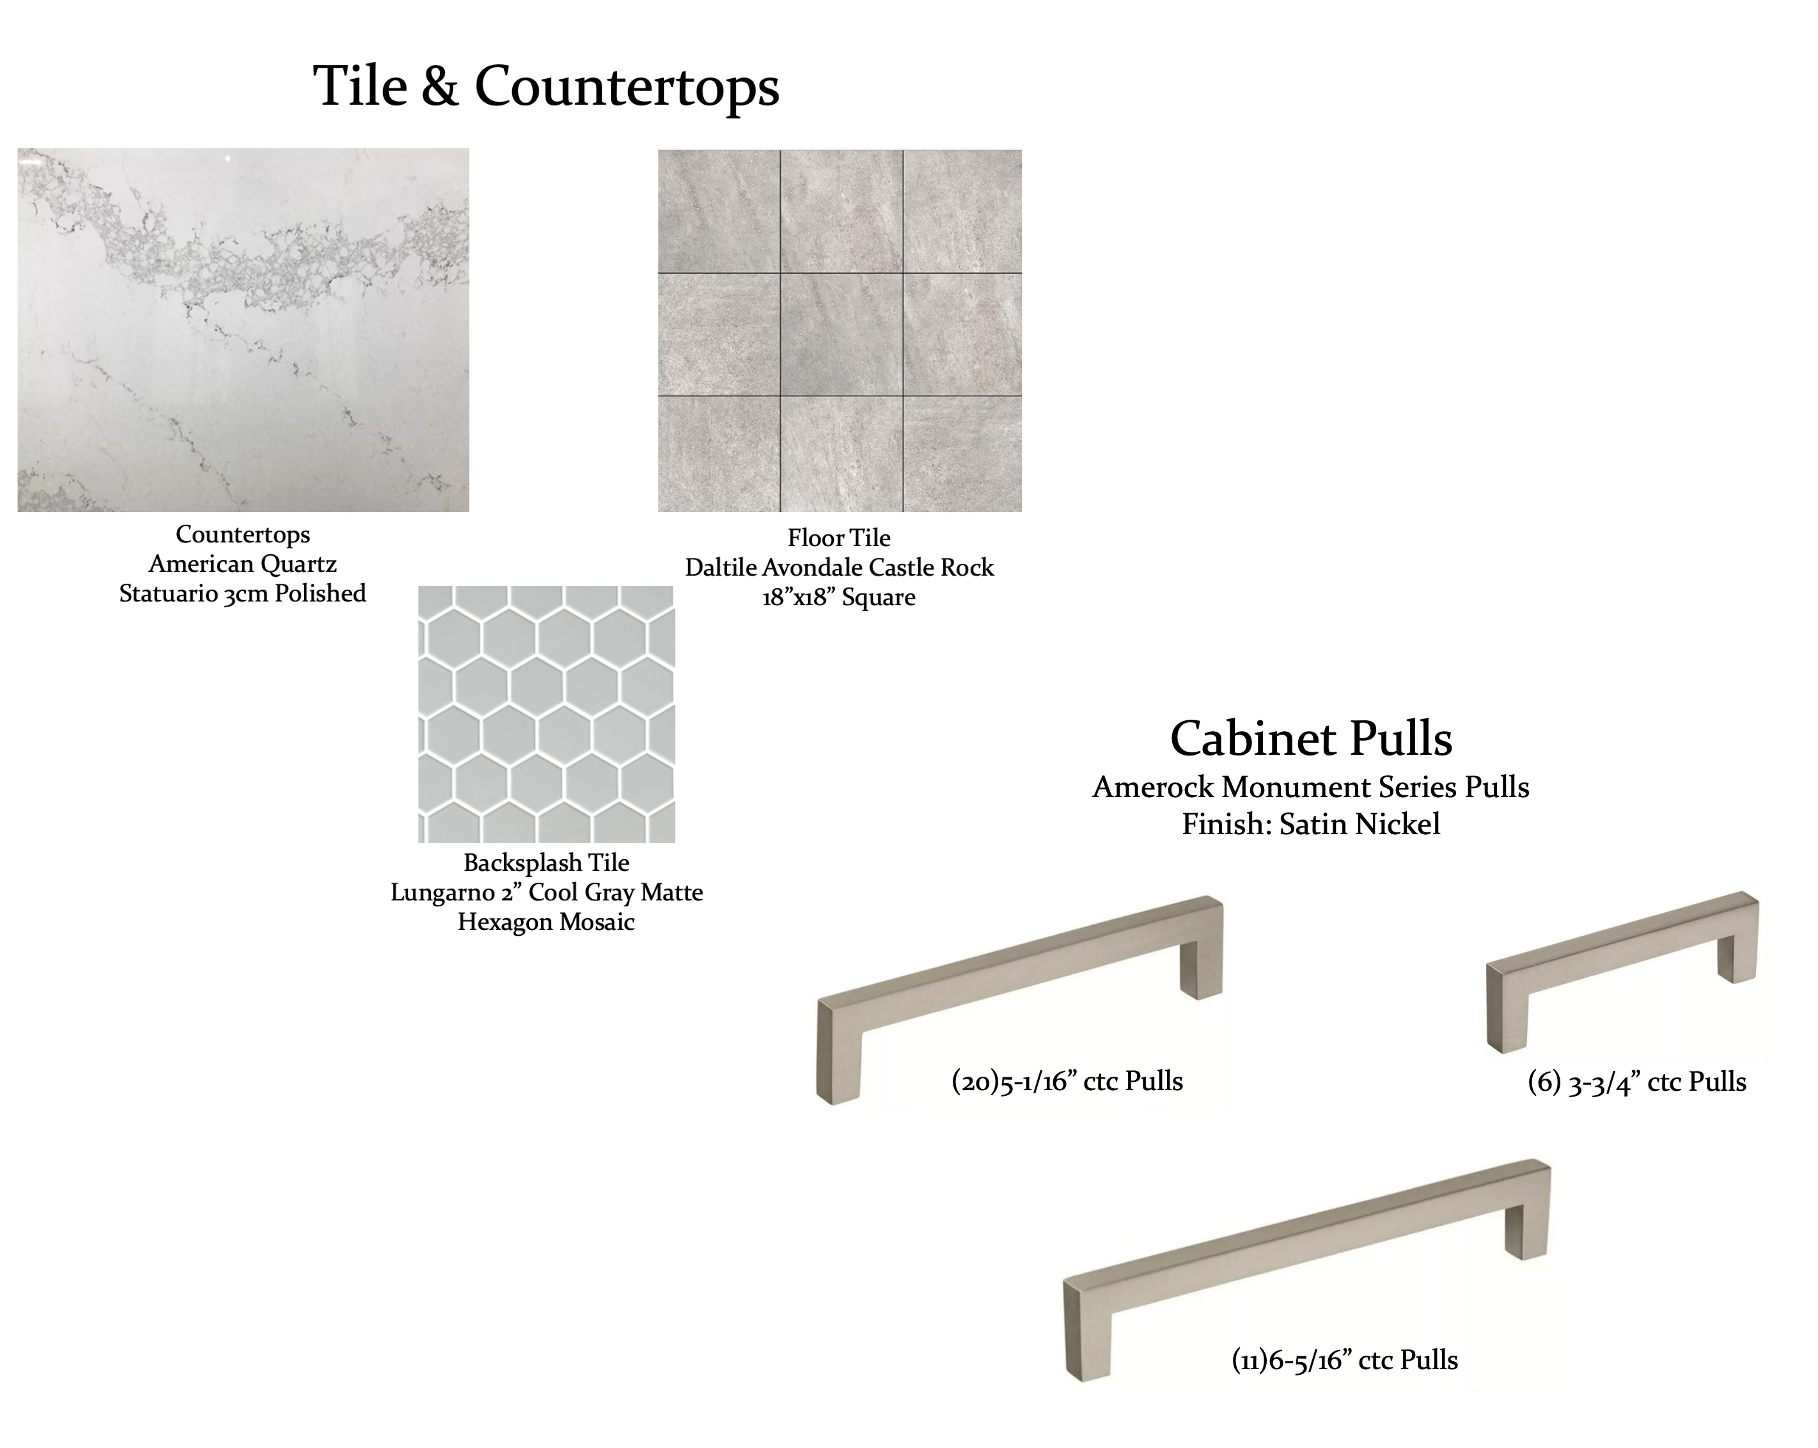
Sleek stainless-steel appliances contribute to the streamlined look of the cabinets, and white American Quartz countertops create a nice color contrast against the natural wood tones and satin nickel hardware.
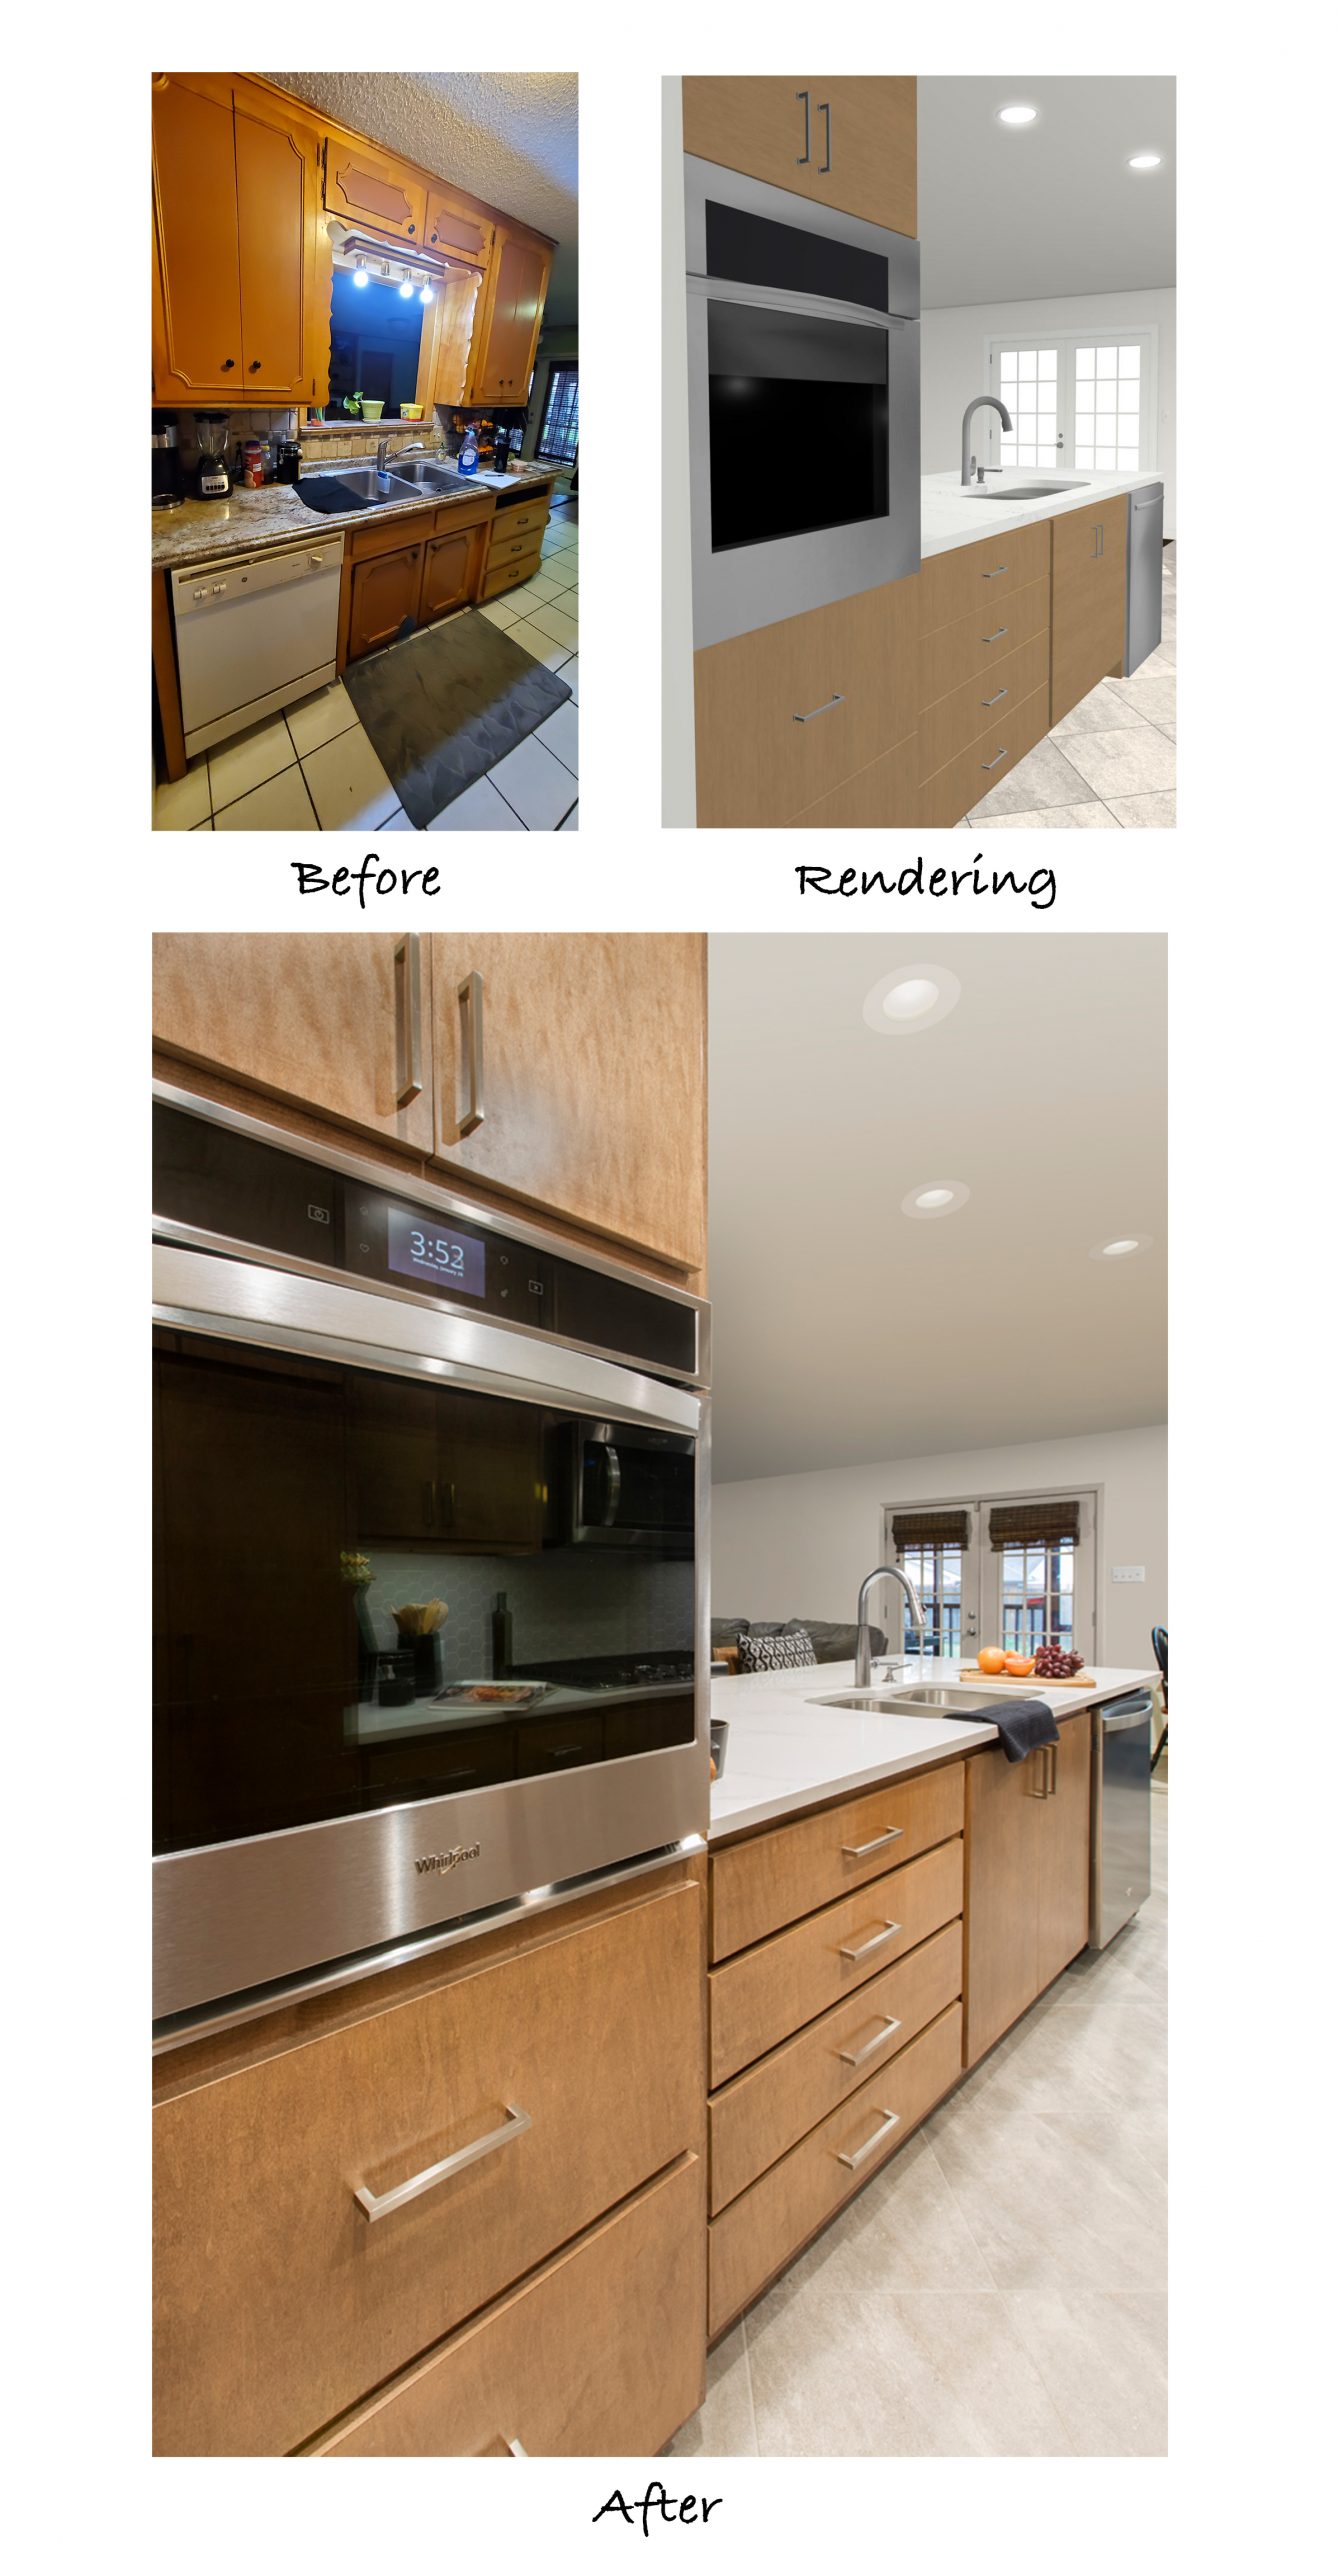
It’s amazing how much larger the room looks after upper wall removal! Although some upper cabinets were lost, deep pan drawers were installed below the counter beside the sink and below the new wall oven, providing great additional storage and utilizing the available space. This also allowed for convenient cookie sheet storage in the cabinet above the oven.
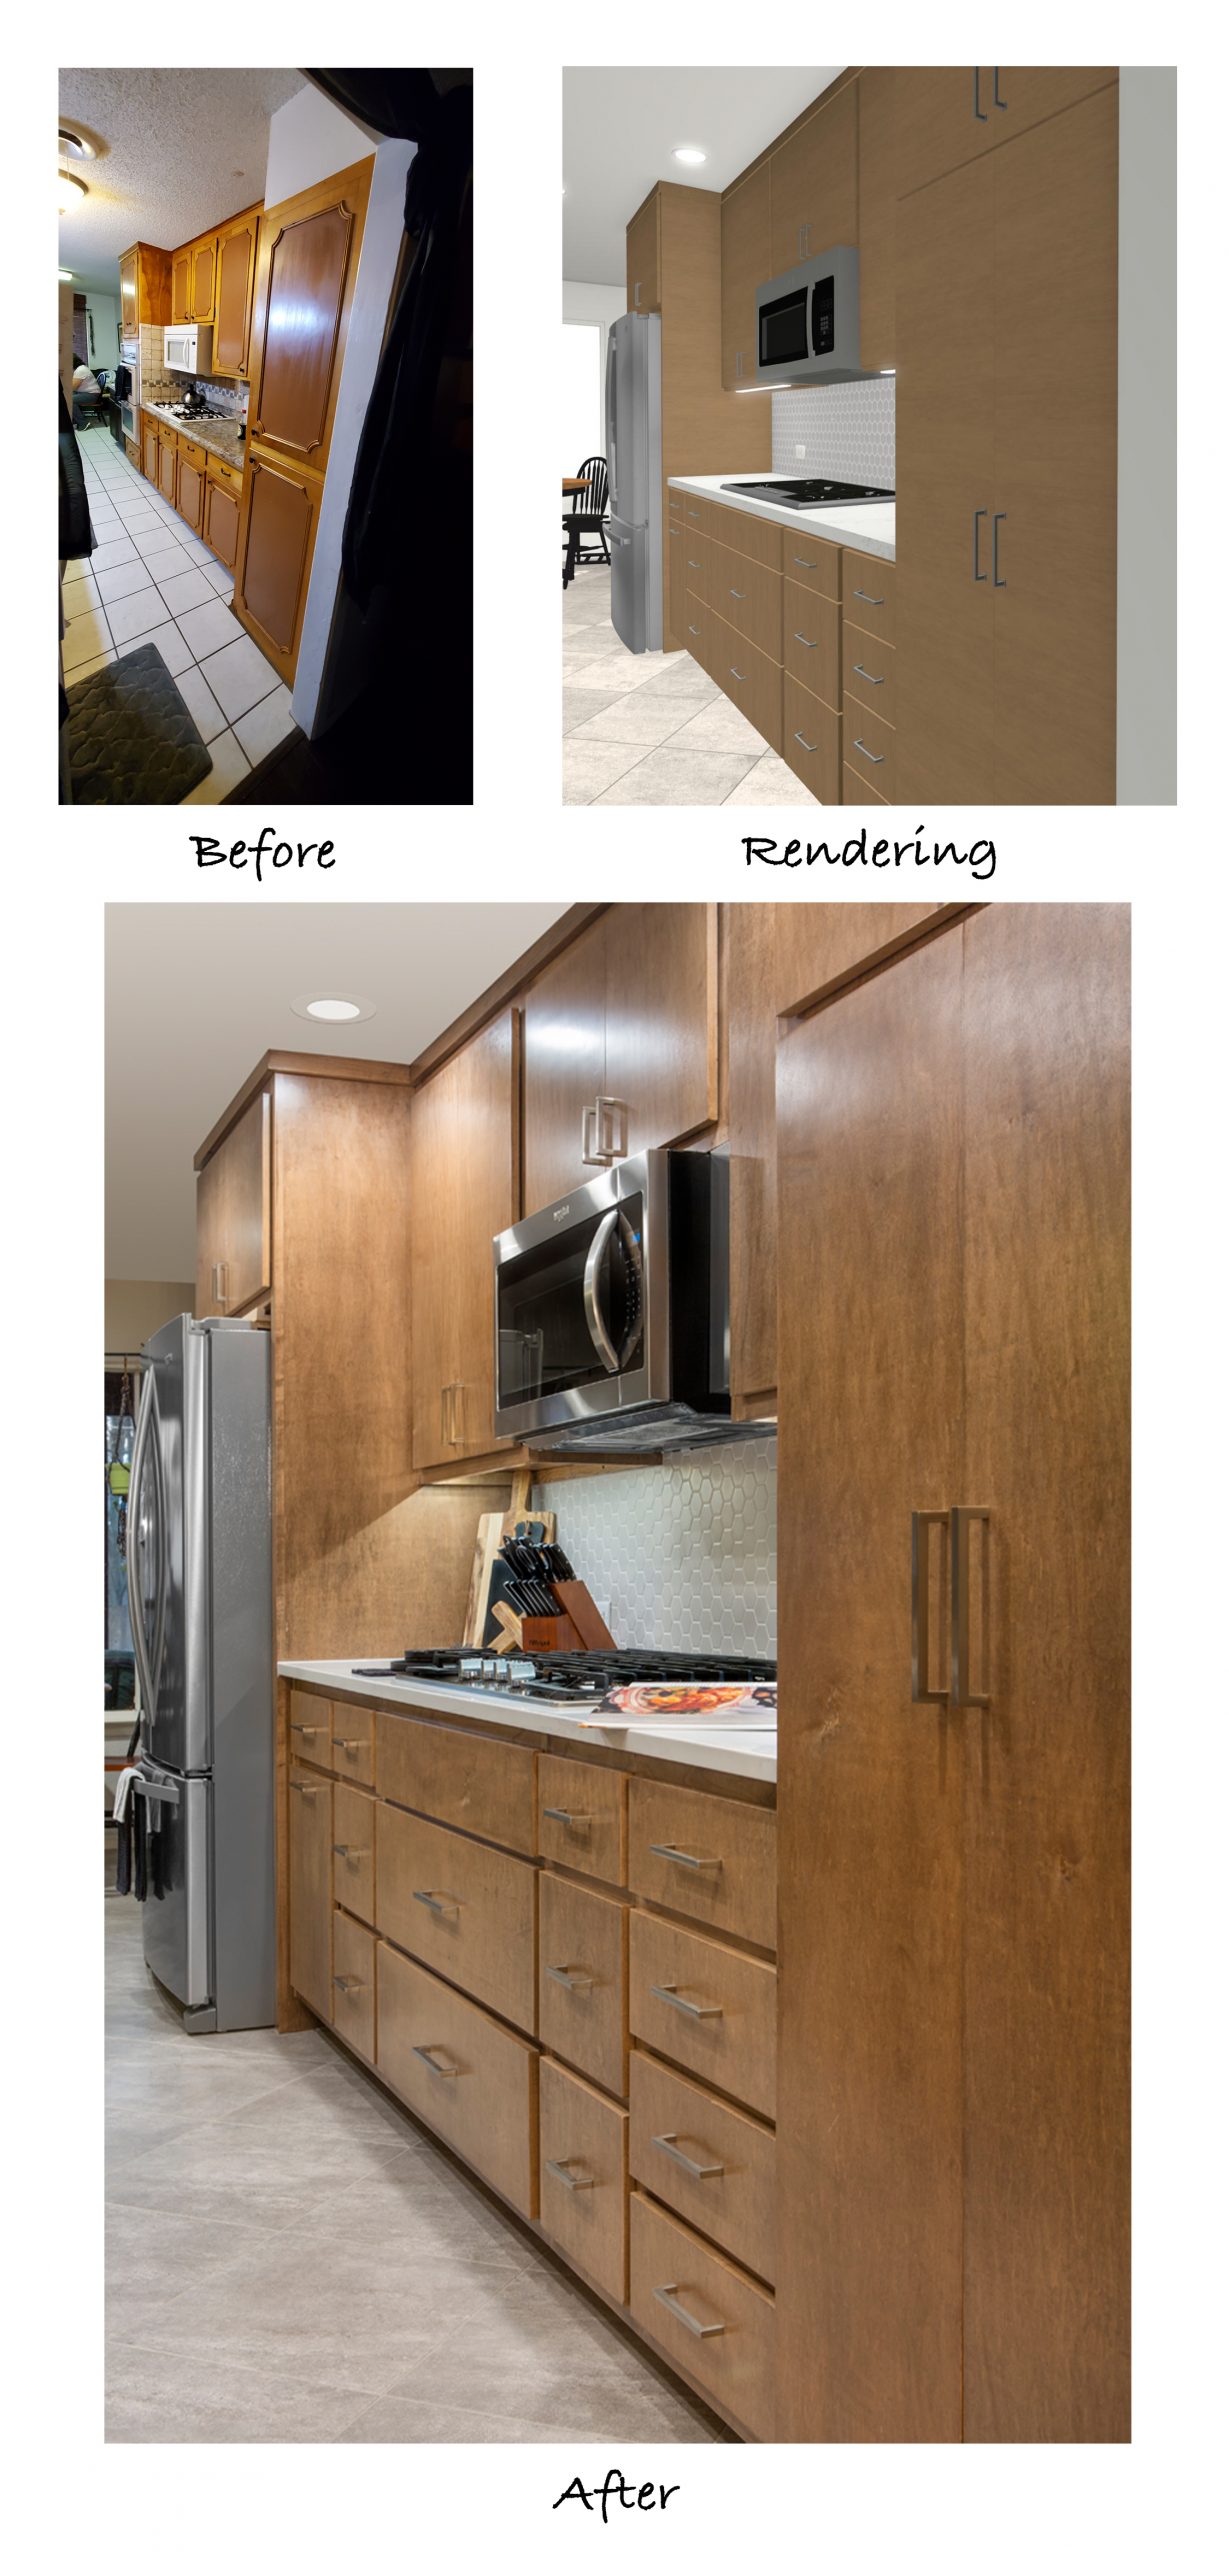
On the back wall of the kitchen, a notable change was removing the walls surrounding the pantry. Not only did this create a cleaner look, but it allowed for significantly more storage space inside the pantry. Freeing up storage space is the ultimate goal when you have a small kitchen! For that same reason, the lower cabinets were replaced with drawers. Often times, drawers are more efficient than lower cabinets because they allow you to use the entire space for storage, instead of having a lot of wasted space in the back of a large cabinet. Drawers are much easier to access and utilize for storing food items, cookware, and heavy dishes.
The upper cabinets were also enhanced to optimize storage space, with the inclusion of adjustable shelving inside. This will be very helpful to our client in the future as she needs to modify her shelving to customize the storage space.
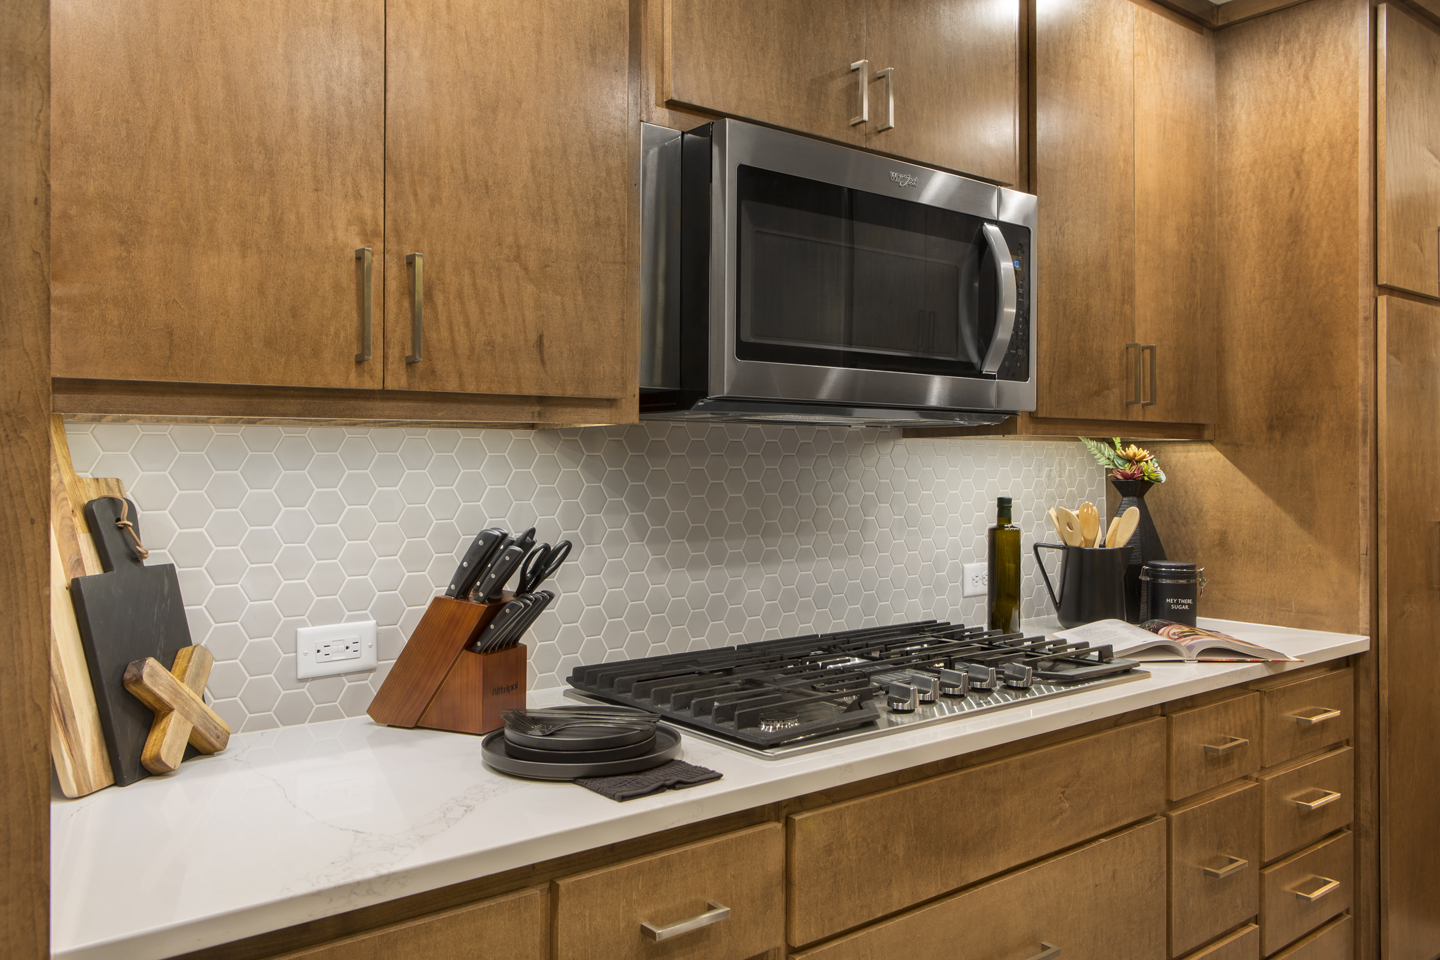
Hexagon mosaic tiles in a matte finish create a modern backsplash with a neutral color scheme, just as the client hoped for. We love how the geometric pattern compliments the aesthetic and personality of this kitchen!
The finished product is exactly what the client wanted for her kitchen, and our team is thrilled to have been able to make the dream a reality. We’d like to give credit where credit is due for this project:
Structural Design: Mike Medford, Sr.
Aesthetic Design: Stephanie Milford
Drafting and Renderings: Brandy Anderson
Production Management: Michael Medford, Jr.
Project Management: Dave Broadfield
Trim Carpentry: Dave Broadfield, Greg Haws, Scott Vernon
Cabinets and Shelving: Bailey Cabinets
Plumbing: Express Plumbing
Electrical: Marc Miller Electric
Paint: Phillip Painting Company
HVAC: Southern Air
Tile & Counters Fabrication: HRG Granite
Countertops & Tile: Hilton’s Flooring & Tile
Staging: Ali Doskocil, Terri Doskocil
Final Photography: Impressia– Todd Ramsey
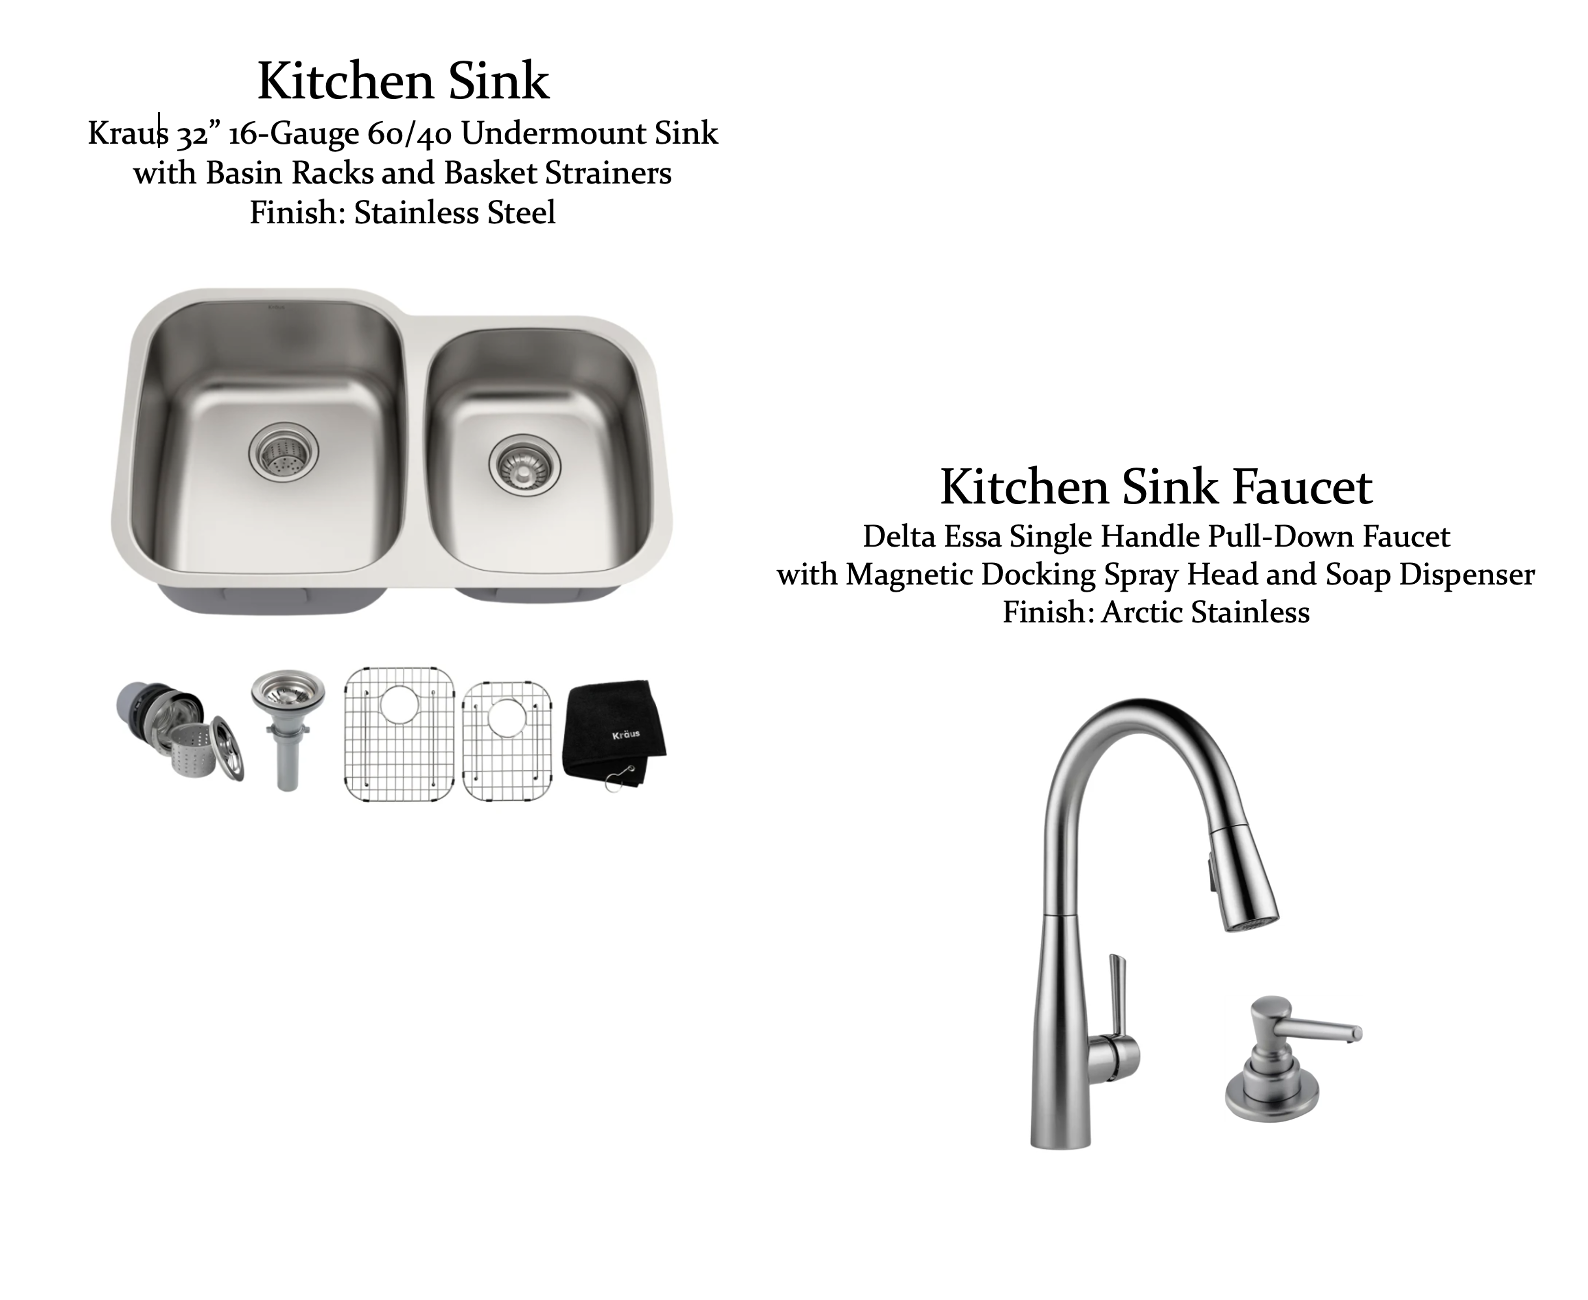
We also wanted to share a list of the design selection items that were used to create this space:

If you’ve got a small kitchen that seems impossible to update, give us a call. Our team is experienced with optimizing available space, improving functionality, and of course, creating the overall look you have always wanted for your kitchen. Contact us today to get started!
Warm Regards,
The Medford Team